Introduction
Hello XR developers! 🌟 Today, we’re diving into the exciting world of Meta Quest development in Unity. Whether you’re a newbie with a Meta Quest headset or a seasoned developer looking to explore the Meta ecosystem, this guide is your starting point. Let’s set up our development environment, explore the Meta Quest Developer Hub, and create our first VR app on Meta Quest. If you enjoy this content, consider supporting my work on Patreon or subscribing to this channel. For any queries, our XR devs Discord community is always open!
Setting Up Your Development Environment
- Hardware and Software Requirements: You’ll need a Meta Quest headset (like Meta Quest 2, 3, or Pro) and a computer with at least a 2.0 GHz processor and 2 GB of RAM, running Windows 10 or higher, or macOS Sierra 10.10 or higher. 🖥️
- Initial Setup: If you’re setting up your Meta Quest for the first time, use the Oculus mobile app from Google Play or the App Store. Follow the instructions on your phone and headset, or check out Meta’s in-depth tutorial. Meta Quest 3 | How to Setup
- Installing Unity Hub: Download and install Unity Hub from the link in the description. Sign in, choose your license (free or professional), and you’re good to go. 🛠️
- Unity Editor Installation: Meta recommends using Unity 2021 LTS. Make sure to include all necessary Android modules during installation. If you’re new to IDEs like Visual Studio, install it during this step. Download Archive
Creating Your First VR App
- Project Setup: In Unity Hub, create a new project with the Universal Render Pipeline (URP) for optimal VR performance. Name your project, save it, and uncheck Unity Cloud and version control if not needed. 🌐
- Building Your First Scene: Open your project, create a new sphere in the scene, and position it. Remember to save your work frequently. 🌍
- Configuring for Android: Switch to the Android platform in the build settings before importing any assets. This step is crucial for a smooth workflow. 📱
- Installing XR Plugins: In the project settings, install the XR Plugin Management and choose the Oculus Plugin for Meta Quest, enabling it for both Android and Windows. 🎮
- Importing Oculus Integration: Use the Unity Asset Store to import the Oculus Integration package. This gives you access to essential functionalities like camera rig and controller interactions. Unity Package Manager (UPM): Important Meta XR SDK Release Updates for Unity
- Project Setup Tool: Utilize the Oculus Integration’s Project Setup Tool to optimize your app for Meta Quest. This tool saves time and ensures your project is configured correctly. ✔️
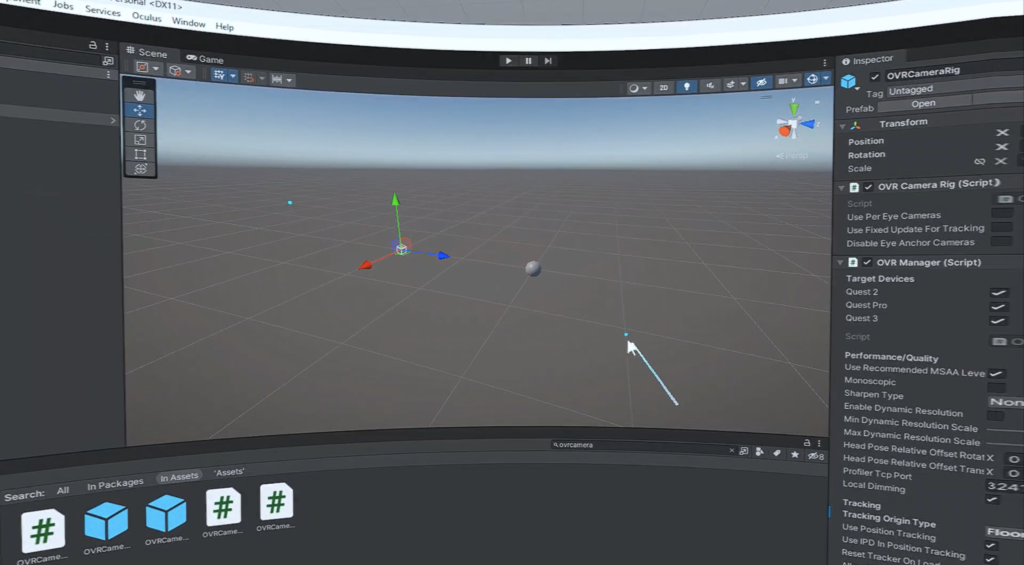
- Setting Up OVR Camera Rig: Replace the main camera with the “OVR Camera Rig” from the project window. Adjust the “OVR Manager” settings, ensuring the “Tracking Origin Type” is set to Floor. 📸
Testing and Deployment
- Oculus Link App: Download and install the Oculus Link app for real-time testing in your Meta Quest headset. Ensure your PC meets the necessary requirements. Requirements to use Meta Quest Link
- Building and Running Your App: Use the “Build and Run” option in Unity to test your app directly on the Meta Quest. For more control, build an APK and use the Meta Quest Developer Hub. 🚀
- Meta Quest Developer Hub (MQDH): Install MQDH to manage your device, capture gameplay, and deploy apps. Connect your headset, enable USB debugging, and activate Developer Mode. Meta Quest Dev Center – Meta Quest Developer Hub
- Deploying and Managing Apps: Drag and drop your APK into MQDH to install it on your device. Manage your apps and access device logs, screenshots, and recordings through MQDH. 🛠️
Conclusion
You’re now equipped to start your journey in Meta Quest development! You understand the setup process, the necessary tools, and how to test and deploy your VR apps. Stay tuned for more tutorials and join our community for ongoing support. Thanks for watching, and see you in the next video! 🌈
Support Black Whale🐋
If you find our content helpful, consider supporting us on Patreon. Your contributions enable us to continue creating free, high-quality educational material 👍.
Thank you for following this tutorial. Stay tuned for more in-depth and insightful content in the realm of XR development! 🌐
Did this article help you out? Consider supporting me on Patreon or simply subscribe to my YouTube channel!